
How to use AlinhaSpine
Step by step for each feature, from the X-ray to the rod template, the trunk photo and follow-up with outcome scores. To practice risk-free, use the "Sample" button: the X-rays are synthetic and already marked. The app is available in English, Spanish and Portuguese (switch in "About"); button names are shown in quotes.
Overview in 20 seconds
On this page
01
Open and calibrate the X-ray
- Tap "Open X-ray" and pick from Photos or Files, or take a picture of the PACS screen.
- DICOM files (.dcm) open directly too: the app reads the image and, when the file includes the pixel spacing, calibrates it automatically.
- Choose the "Lateral · sagittal" or "AP · coronal" tab and the stage: Pre-op, Planned or Post-op.
- For millimeter values (SVA, rod, coronal balance), tap "Calibrate with ruler" and mark two points of a known distance. Without calibration, the app asks you to calibrate instead of showing pixel values.
- "Contrast" enhances bone: "Automatic", "Invert", brightness and contrast. It only changes the view; measurements do not change.
02
Mark the landmarks
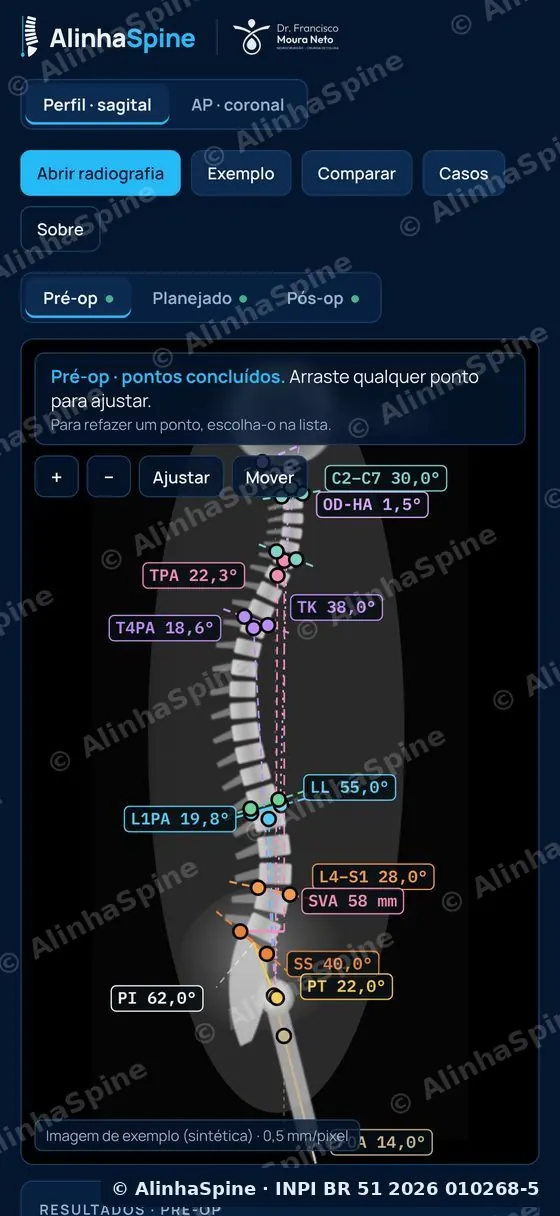
- Follow the list at the top: the app tells you which landmark comes next (femoral heads, S1 endplate, L1, T12, T4, T1, C7…).
- Keep your finger on the screen to see the magnifier and lift at the exact spot. Use + and − to zoom.
- Optional points complete the study: T10 and L2 (thoracolumbar junction), T1 (T1 slope), the inflection point and the lordosis apex (Roussouly arcs and distal lordosis), C2 and the dens (C2PA and OD-HA). If you skip them, only the parameters that depend on them are left out.
- Any point can be dragged later; to redo one, pick it in the "Points" tab.
03
Read the results and references
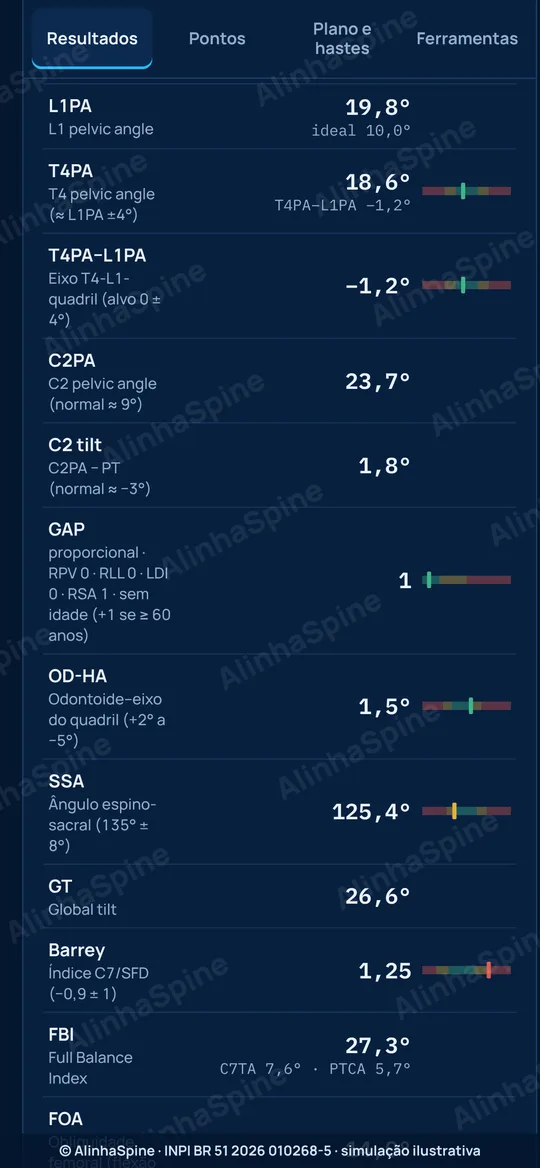
- The "Results" tab lists every parameter with color-coded normal ranges (green, yellow, red).
- References from pelvic incidence, side by side: theoretical PT and ideal LL (Le Huec) and the personalized Hills LL from the T4–L1–hip axis (LL = 1.4 × PI − 1.7 × ideal L1PA − 2).
- L1PA (ideal = 0.5 × PI − 21), T4PA and the T4PA − L1PA mismatch (green from −3° to +1°), C2PA, T1 slope, T1S − CL, TK and the T10–L2 junction.
- Distal lordosis L4–S1 as a % of L1–S1 with the Gadoin reference by PI, maximal lordosis, Roussouly type and SRS-Schwab modifiers.
- GAP score (Yilgor): sum of RPV, RLL, LDI, RSA and age. 0–2 proportioned, 3–6 moderately and 7 or more severely disproportioned. Age is entered in "Scores and follow-up".
- "Labels" shows or hides the values on the image. Formulas and references are under "About".
04
Plan cages and osteotomies
- Tap "Copy pre-op to plan" and go to the "Planned" stage.
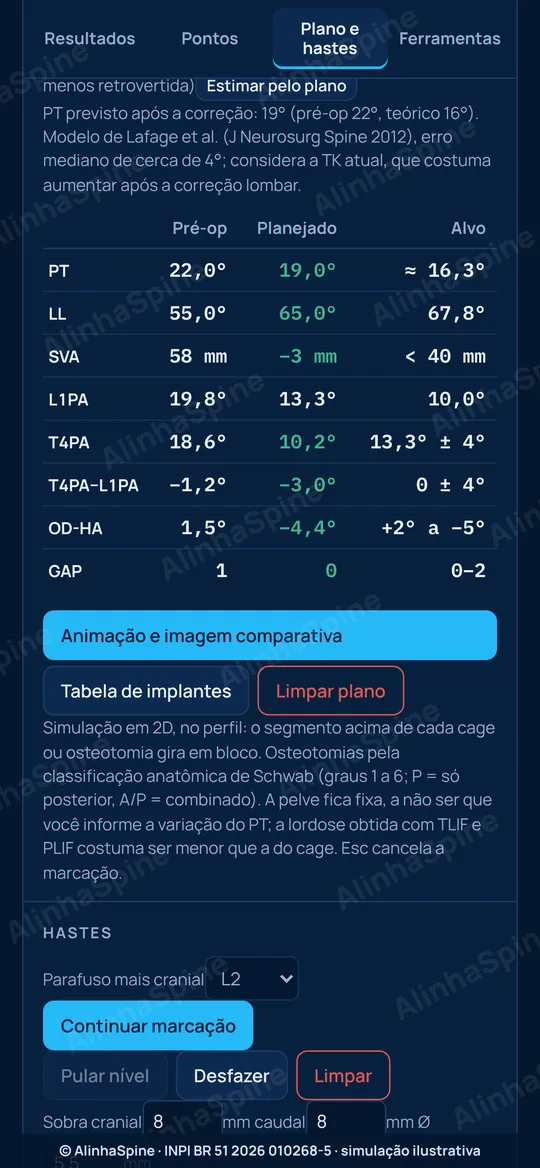
- In the "Plan and rods" tab, pick the procedure (ALIF, OLIF, LLIF/XLIF, TLIF, PLIF or Schwab 1 to 6) and mark the level. Adjust the cage lordosis and height: the spine rotates as a block on the image.
- The table shows Pre-op, Planned and Target for PT, LL, SVA, L1PA, T4PA, the T4PA − L1PA mismatch, OD-HA (when marked) and GAP. Targets: PT close to theoretical, Hills LL, SVA < 40 mm, ideal L1PA, mismatch from −3° to +1°, OD-HA from +2° to −5° and GAP 0–2.
- Surgical L1PA target: 0.5 × PI − 19 (± 2°). The "T4–L1–hip axis" panel shows on a 3 × 3 grid where the case falls (L1PA above, on or below target × T4 dorsal, aligned or ventral), with alerts and patient factors (age, BMI). Tick "Long fusion to the pelvis" when applicable.
- OLIF and LLIF: enter the "Adjacent disc" height or tap "Measure on X-ray" and mark 4 points; the app compares it with the cage height and cites Chung et al. (Eur Spine J 2025).
- "Estimate from plan" computes the expected PT after correction (Lafage: PT = 1.14 + 0.71 × PI − 0.52 × LL + 0.19 × TK) and applies it to the simulation; you can adjust it by hand.
- "Smooth" shows one continuous image, with no seams between blocks. Your implant sizes live in "Implant table".
05
Calculate the rod, the bends and the 3D rod
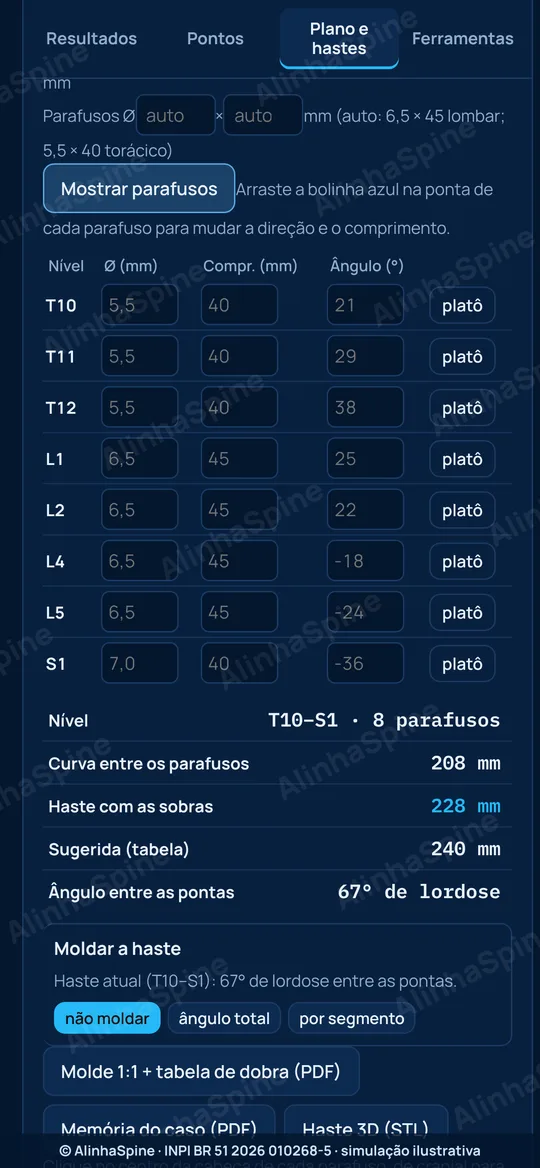
- In "Plan and rods", tap "Rods" and mark the center of each screw head, cranial to caudal. Use "Skip level" where there is no screw; "Show screws" lets you adjust direction and length.
- The app shows the curve between screws, the rod with overhang, the size suggested by your table and the total angle between the ends.
- "1:1 template + bending table (PDF)": the curvature at true size and the angle of each segment between screws (kyphosis or lordosis), for bending at the table. Print at 100% and check the 100 mm bar.
- "3D rod (STL)": with AP and lateral images of the same case, exports the rod in 3D to view or 3D-print. It is a geometric estimate; the final bend is always checked in the field.
06
Case memo for the OR
- Tap "Case memo (PDF)" (in the "Results" tab or in "Plan and rods").
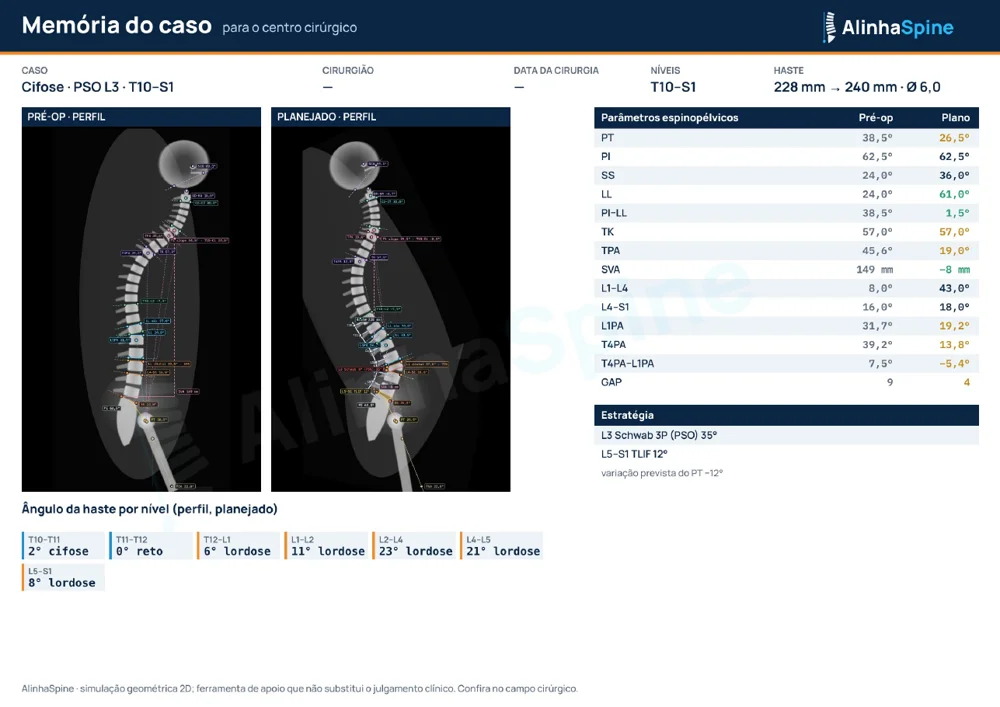
- Give it a title that does not identify the patient. The app builds a landscape A4 page with pre-op and planned side by side, parameters, strategy (cages and osteotomies), levels, rod and angle per level.
- Print it or send it to the OR team and the implant representative.
07
Scoliosis on the AP view: Lenke, apex, shoulders and pelvis
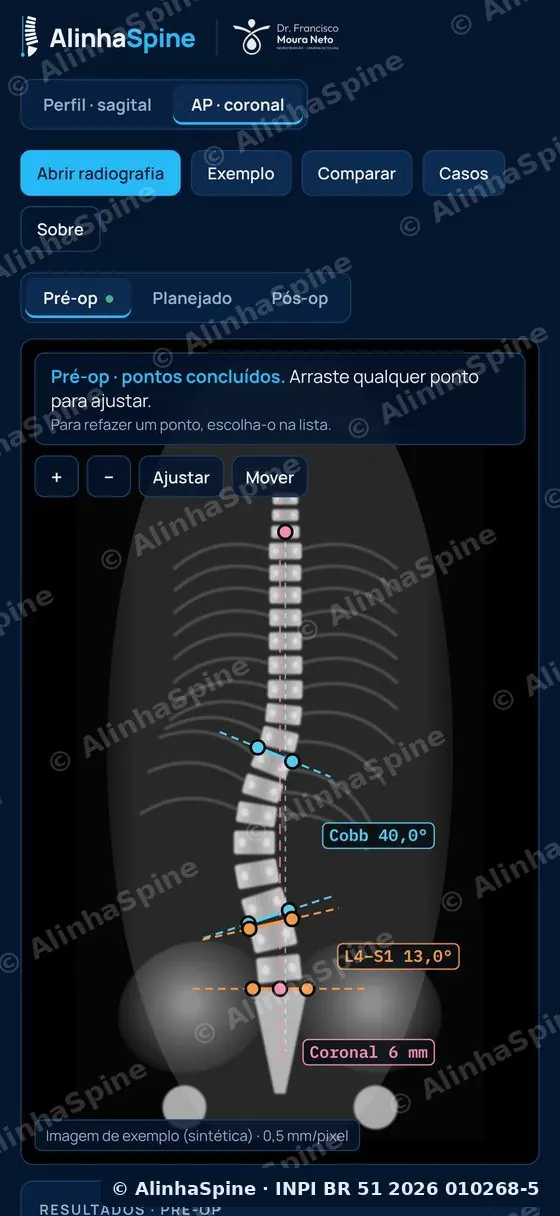
- In the "AP · coronal" tab, mark the endplates of the end vertebrae of the major curve and, if present, the minor curve: Cobb of each curve, L4–S1 fractional curve and coronal balance (C7–CSVL).
- In the "Apex and Lenke" step, mark the center of the apical vertebra and the lumbar apex references: the app computes apical vertebral translation (AVT) and the Lenke lumbar modifier. The sagittal modifier comes from the pre-op lateral TK.
- In the "Shoulders and pelvis" step, mark the shoulders and iliac crests: shoulder height difference and pelvic obliquity, in degrees and in mm if the image is calibrated.
- Rods can also be calculated on the AP view, with a 3D estimate when the same case has lateral and AP images.
08
Trunk photo
- In "More" › "Trunk photo", tap "Open photo": a back view, patient standing, trunk uncovered. Pick the stage (Pre-op, 6 weeks, 3 months…).
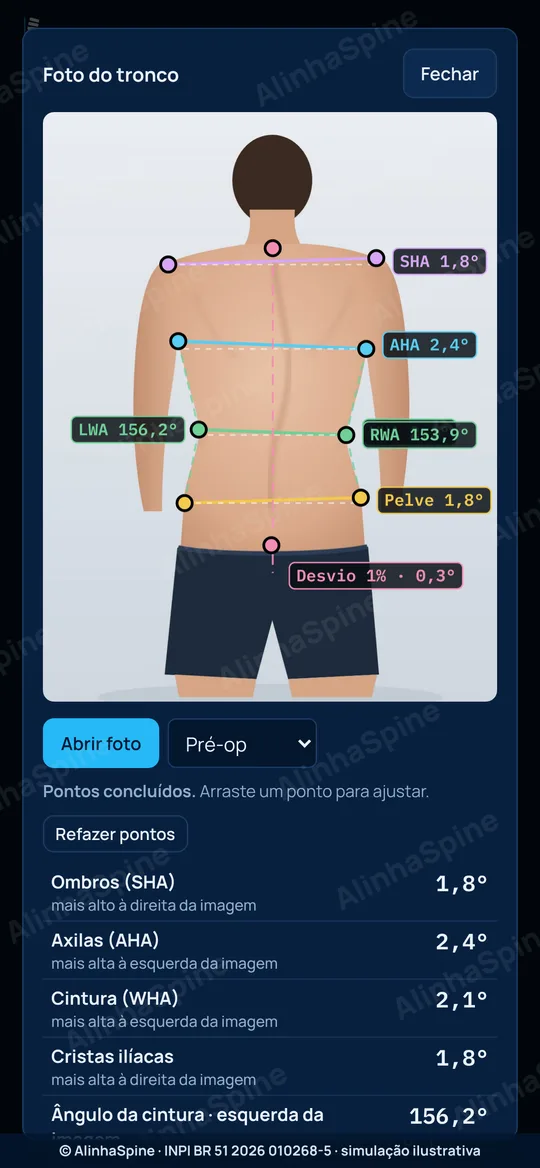
- Mark the guided points (C7, gluteal cleft, shoulders, axillae, waist and iliac crests). The app measures shoulder (SHA), axilla, waist (WHA) and crest height, waist angles, trunk shift and area asymmetry.
- Angles do not need calibration; for millimeters, use "Calibrate with ruler" with a ruler or skin marker.
- "Save to case" keeps the photo by stage and lets you compare before and after side by side. Use only authorized photos, without the face.
09
Scores and follow-up
- In "More" › "Scores and follow-up", enter the surgery date, the patient age (used in the GAP score), weight and height (BMI feeds the patient factors of the T4–L1 axis).
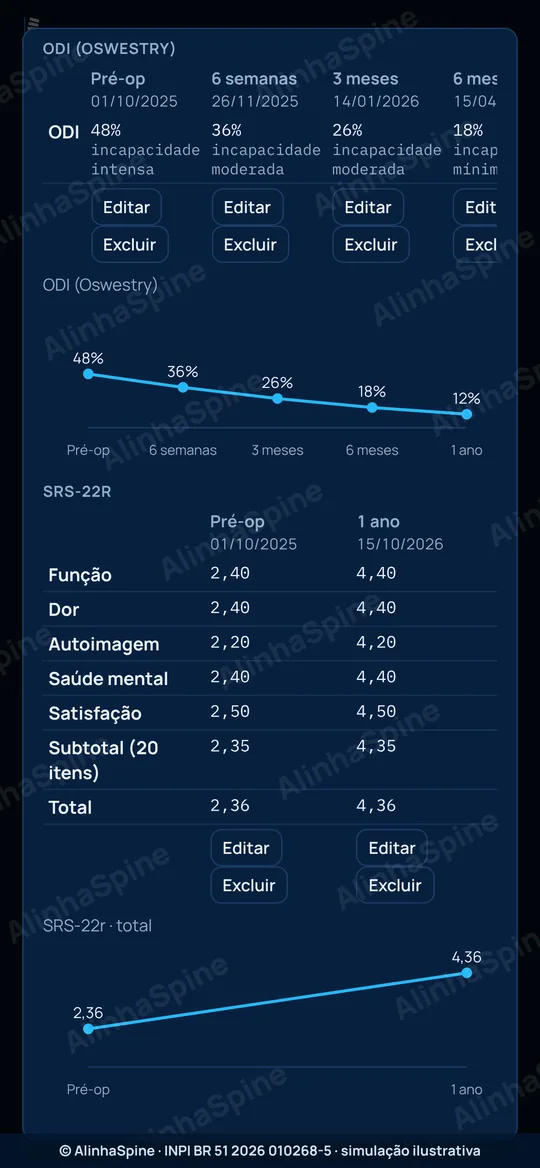
- Pick the score (ODI, NDI, SRS-22r or VAS) and the time point (Pre-op, 6 weeks, 3 months, 6 months, 1 year, 2 years), fill in the answers and tap "Record". The app computes the score and category and plots the trend.
- ODI, NDI and SRS-22r are copyrighted: use the official form on paper or in your own system and enter each item's answer here.
- Reminders: with the surgery date, the app flags when a follow-up is near or overdue and, if you allow it, schedules an iPhone notification at 9 a.m. on each visit day. Nothing leaves the device.
10
Patient mode on the tablet
- In "Scores and follow-up", tick what the patient will answer (low back, leg, neck or arm pain) and tap "Hand to the patient".
- The screen goes full screen, one question at a time, with a large color 0 to 10 scale. At the end, the app asks the patient to hand the device back.
- To exit, tap and hold "Exit". Answers are saved to the case as the VAS for the selected time point.
- For now only the VAS appears in patient mode; copyrighted questionnaires will be added once a license is granted.
11
Compare and present
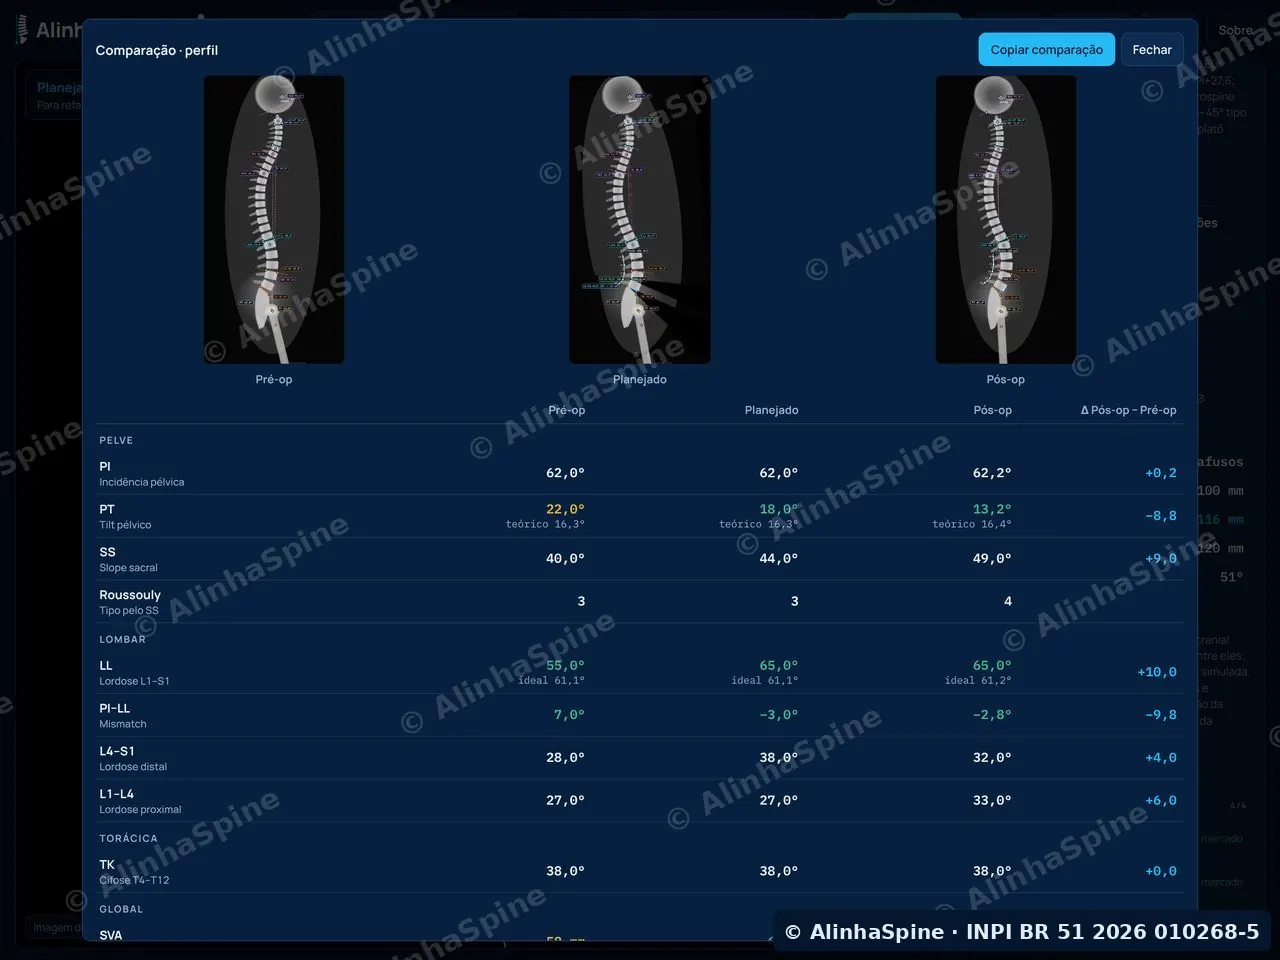
- Tap "Compare" to see pre-op, planned and post-op side by side, with the difference for each parameter.
- "Animation and comparison image" creates the image or video of the case with SVA, LL, PT, L1PA and T4PA in their range colors and the illustrative-simulation notice.
- "Case PowerPoint" builds the presentation with images, measurements, trunk photo and scores. Slides carry the AlinhaSpine watermark and, if you wish, your name ("Your name on the slides (optional)").
12
Cases, iCloud, report and export
- In "More" › "Saved cases", keep the case on the device. Identify it only by initials or a code. A case can hold just photos and scores, with no X-ray.
- Turn on "Sync with iCloud" to have your cases on iPhone and iPad through your Apple account. It is off by default; AlinhaSpine has no access to this data.
- "Copy report" creates the text for the medical record; "Image with measurements" saves the annotated X-ray; "Export landmarks" creates a CSV for research.
- Nothing is sent to AlinhaSpine servers: cases leave the device only when you share them.
13
Subscription and codes
- The first 30 days are free with full access; without subscribing, every feature can be explored in the Sample.
- Have a residency or event code? On the subscription screen, tap "I have a code".
- To cancel: iPhone Settings › your name › Subscriptions.